
This was originally going to be one post but it got to be a bit of a monster(!), so I've decided to split it up instead. Hope you like.
The Kit
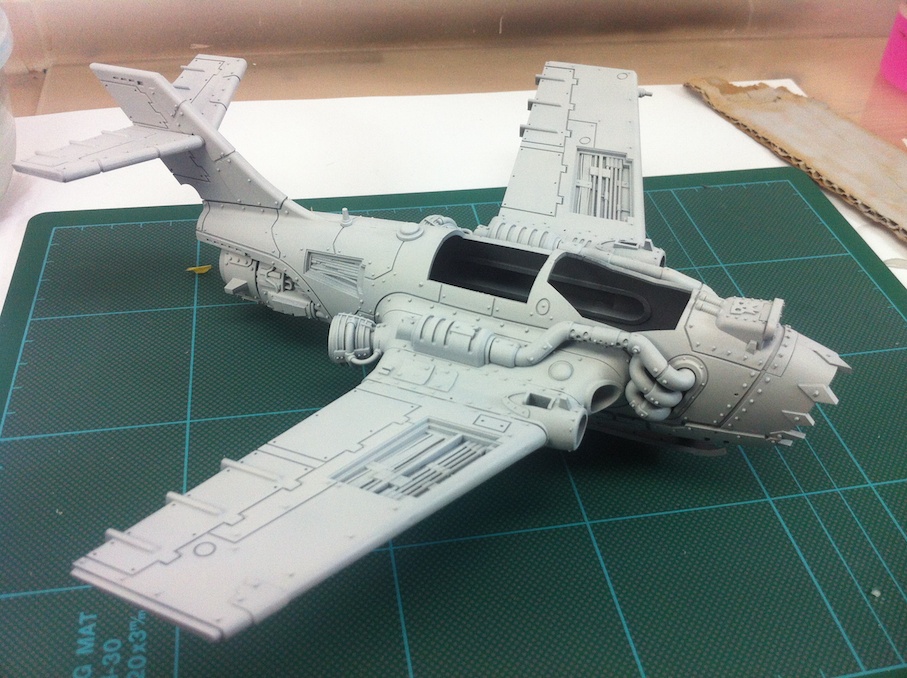
Whichever configuration you choose to build the Ork Bommer is a really pleasing model to look at. Taking it's design cues from aircraft in the real world, the Stuka dive bomber, the Mig 15, the F-86 Sabre and (I think) the Il-2 sturmovik, GW have come up with what I think is a kit that combines personality, aggression and malicious intent. It perfectly suits the Orks.
The configuration I chose was the Blitza Bommer. I just think it looks the most interesting with it's angled up wings, rear gunner and cannon, it's very evocative of the Stuka which I love. I also really like the wing and tail air breaks, which again, add visual interest.
Building
So, to building! Straight off I have to say, if this is the standard of plastic kit we can expect from GW from now on then there's going to be a lot of happy modellers out there. Not only is the detail and casting of a very high quality, the fit and precision of each part was virtually perfect. No warping, hardly any filling, I was very impressed indeed. Even better, because I was painting a lot of parts separately, I had the confidence in knowing that when they did go on, they would fit perfectly.
Anyway, enough gushing about the kit. On to the step by step:
To begin with all the parts I was going to use were cleaned of mould lines, of which there were very few. When they did occur they were very light and pretty easy to remove. It's the part I hate most but it has to be done!
Sub-assemblies
I decided to build the main fuselage including wings, tail section, exhaust's, landing skid and landing hook chain, in one large sub-assembly. As it turned out I wish I had left off the landing skid and exhaust's too as they proved a bit of a pain to mask off later down the line. More on that later. The front and rear canopies were masked off with Tamiya masking tape.
Virtually everything else was to be painted before it was attached so I glued most of the parts on cocktail sticks and stuck them into an old bit of polystyrene packaging to make it easier to airbrush and brush paint without touching.
Where it made sense I built the item before mounting it, like the bombs and the pilot in his chair. Items that could be tricky to paint later were left separate, e.g. the pilot's arms were left separate from the pilot. Although this creates more work initially, I see it as time (and frustration) saved later on.
To make it easier to glue items onto the cocktail sticks I would take off the point of the stick with a craft knife before gluing. In some cases I drilled a little hole in the item (e.g. the pilots chair) so it would sit securely on the stick. Clearly, it's important to attach the cocktail stick to a part of the model that will be hidden from view on the final model! At this stage I also took the opportunity to drill out the gun barrels of the main cannon and rear gun.
Some items were stuck down with Blu-tack on an old piece of cardboard or stuck on with double-sided tape (or in my case, 'folded-over' masking tape). It's important to make everything secure before painting with an airbrush, otherwise it will literally blow away.
Which is annoying.
 |
| Must...resist...urge...to make...jet and machine gun...noises... |
 |
| The buffet selection was pretty poor |
 |
| Gunners seat, gunners canopy (masked) and pilots cockpit |
 |
| Air-break's and pilots canopies' |
Priming
The next step was priming. I airbrushed 3 thin coats of Vallejo Light Grey Surface Primer onto the main fuselage leaving about an hour or so between each one.
I use the airbrush to prime because I dislike priming sprays which I don't feel give me enough control, they smell 'really' bad and create a lot of overspray which means you just can't use them indoors. An airbrush is more work and more cleaning but I like the finish better, besides which the weather has been so wet in the UK lately that if I relied on priming sprays I'd never get anything done! Spray cans don't perform well in wet or humid conditions so airbrushing just makes the most sense to me all round.
Everything else gets the light grey primer except the pilot, the gunner, the cockpit instrument panel and the guns which are all primed with Vallejo Black surface primer.
 |
| Can't we just leave it like this? |
 |
| Black primer |
The Vallejo surface primer seems to shrink to fit the model which gives a really pleasing finish. Kind of reminds me of a 3D model or something (which I guess is how it started life). It almost seems a shame to go onto the next step, mostly because it's going to make our pristine model kind of messy looking.
Pre-shading and the modulation technique
Pre-shading is a technique developed by the scale modelling community. The idea is to shade the panel lines and darker areas on the model prior to applying the base coat, hence 'pre-shading'. The result, especially when used with light base colours, is to add volume and depth to your model which may otherwise look a bit flat.
To pre-shade my Ork flyer I use Vallejo dark grey surface primer concentrating on the panel lines and even some of the rivets. This is a lot more tricky as my airbrush isn't really designed for closer, more accurate work. Never the less, this is the result.
 |
| Um... Are we sure it's supposed to look like that? |
Looks pretty horrific right? Well, that will change but we have a few more steps before it looks good again! I then airbrush black surface primer on to the exhausts, the engine's and the landing skid. Nice and quick.
 |
| Painted exhausts, skid and engine |
The next step is a technique, again borrowed from those talented chaps from the scale modelling community, and it's called the modulation technique. If pre-shading adds shadows and depth, modulation is for adding highlights. Again the idea is to add volume to the model before the base coat goes on.
It's at this stage I realise my error. I don't want to get modulation highlights or base coat onto the black areas I've just painted so I need to mask them off, which I do with Tamiya masking tape. It takes 'ages' and I mentally kick myself for not leaving them off the model and creating all this extra work! Do yourself a favour and paint the exhaust and landing skid separately!
 |
| Masking. It takes ages! |
Next I airbrush white surface primer onto the areas of the model that I want to appear highlighted. I also mask off the air break 'wells' as I don't want them to receive the base colour or modulation step. The picture below shows the results of my airbrush getting a bit clogged up. You can see white specks where it's kind of 'splattered'. This isn't ideal but I didn't see it as a deal breaker especially as the finished model was going to get heavily weathered up. However, to make sure you don't get this effect clean your airbrush often, even between colours if necessary.
 |
| Modulation done |
Basecoat
So I've primed, pre-shaded and 'modulated' now it's time for the base coat.
The colour I choose as my base colour is Vallejo model air Ochre. I thin it with vallejo thinner and a drop of water before airbrushing so that I know I'm not going to totally obscure my pre-shading and modulation. As it turns out I need about 4 thin coats before I get to a point that I'm happy with.
 |
| Dry fit |
The picture above show's a 'dry-fit' of the cockpits, canopies and air-breaks. I did this a lot. Partly because I wanted to make sure I was getting the right tone across all the separate parts and partly because I was being a big kid and just wanted to get an idea of how cool it looked! It was all I could do to stop myself picking it up and fly it around making jet and machine gun noises.
I might have done that a couple of times…
Anyway
 |
| Highlights added + 'dry fit' of airbreaks and cockpit sections |
So that's it for Part 1! I hope this turns out to be helpful for people building this model but please leave comments and crits below.
In the meantime my rough plan is to write 1 (maybe 2) more parts for this depending on time, space, the economy etc... plus I have some great 'vehicle' projects waiting on the bench which need my attention where I'll hopefully be doing something similar.
Very cool man! I haven't taken the plunge into the airbrushing scene, but this has really got me thinking about it. I really dig how it all comes together - thanks for the step-by-step, I'm looking forward to reading more!
ReplyDeleteHey Mordian, thanks and I'm glad you like the SBS so far. Airbrushing definitely has it's place, especially for painting vehicles (which I know you produce an insane amount of!). There's a relatively hefty initial cost on equipment and it seems a bit tricky initially, but it's well worth it in my opinion.
DeleteI'll be writing a post on the various bits and pieces you need for airbrushing in the not too distant future too, so watch this space...