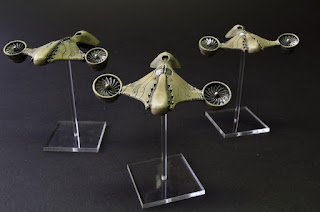
I'm hoping normal(ish) service will now be resumed for the forseeable future and I'd like to kick things off with some pics of my most recent project, 3 Neptune Dropship miniatures for Dropzone Commander!
Again, sincere apologies for the abrupt stalling of my blog, but I'm back painting again with a sense of renewed enthusiasm, helped very much by these brilliant little resin miniatures from Hawk Wargames.
The design and detail of these things is brilliant. I love the shape of these and the resin was really nice to work with although it was very thin in places and there were a few air bubbles but nothing too disastrous.
I decided to paint something similar to the studio colours as I think it suits them really well. As is my habit now I've made them look a bit moody and weathered to suit my aesthetic style. I kind of like the bone colour they have, it kind of suits their organic flowing lines and I'm really happy with the way they turned out.
No walkthrough this time but I will be doing one in the not-too-distant future I hope. In the meantime I've put together a little workflow/list thingy which details the processes I went through. It's actually very straightforward!:
Airbrush Priming
1. Vallejo Panzer Grey Surface Primer all over
2. Vallejo Light Grey Surface Primer - light coat all over except underside of abdomen
3. Vallejo White Surface Primer - highlight areas that would receive more light/focal points
Airbrush Basecoat
1. Vallejo Model Colour (VMC) German Camouflage Beige - Thinned 1/1 ratio with water
2. As above with added VMC White for highlights
3. As above with even more white for highlights!
4. Vallejo Model Air (VMA) Aluminium airbrushed onto underside of abdomen (masked off beige areas)
5. Painted on VMA Aluminium to all other metallic areas with a size 0 Raphael 8404 brush
6. Sealed with Vallejo Matt Varnish
Wash
1. Painted on plenty of black Flory wash all over the model and waited 20-25 mins until dry
2. Wiped off excess wash with damp cloth/cotton bud
Detail
1. Edge highlighted sharp corners (there weren't many!) with lighter version of base colour
2. Painted in tiny lights with red, blue and green Vallejo model colours.
I know it's better to have some pictures accompanying this so I'll try to do that for next time.
In the meantime, enjoy the pics and I'll try not to leave it so long between posts!
cheers
Paul


Very cool paint job but I'm wondering why you used 3 primers (and I'm not referring to the 3 different colors) instead of starting with the the panzer grey primer and then going over it with vallejo model air light gray (it's the same color of the gray primer) and white. I think that three almost complete layers of primer are gona be thicker then one layer of primer and two of paint or am I wrong? thank you!
ReplyDeleteHi Marco, good question! My experience is that you need 2 coats of Vallejo surface primer to give you a really strong foundation. Certainly on plastic mini's a single coat can get scratched off fairly easily. The white coat I'm putting on is very thin and concentrated on the highlight areas only.
DeleteThis resin seems to stand up better but old habits die hard. Too your point about the relative thinness/thickness between primer and paint I don't think there's much in it if anything. They seem the same to me. Also there's a cost factor to consider. I can buy surface prime in 200ml bottles which work out cheaper in the long run than the little 17ml bottles that model air comes in.
I'm actually pretty sure I could go another 2 or 3 layers without affecting the detail at all. Having said all that there's no reason why you can't adopt the technique that you suggest, I'm sure you'd get the same result! Hope that helps?